


We’ve all been in that situation. You spend a lot of money on a beautiful piece of Cook Steak in a Cast Iron Skillet and Oven, hoping to recreate the steakhouse experience at home. You picture a crust that is deep and crispy, giving way to a juicy, perfectly pink inside. But what really happened? It’s often a sad, grey, and chewy affair that makes you wonder about your life choices and cooking skills. It can feel like you’re chasing a mythical beast when you’re looking for the perfect steak that tastes like it came from a restaurant.
But what if I told you that the secret isn’t a fancy piece of equipment or a difficult cooking method? A cast-iron skillet and your oven are all you need to make great meals at home. This method, also known as “pan-sear and oven-finish,” gives you great control and keeps tough, overcooked meat out of your kitchen for good. This is the secret to always cooking a perfect steak in a cast-iron skillet and oven.
This guide will tell you everything you need to know. We’ll discuss why this method is superior to pan-frying, outline the steps for preparing a perfect ribeye steak in a cast-iron skillet and oven, and address the most common mistakes to help you avoid them. Get ready to change the way you cook steak.
Table of Contents
- Why a Cast Iron Skillet and Oven is the Ultimate Combination
- Common Challenges When Cooking Steak (And How to Solve Them)
- Step-by-Step: How to Cook Steak in a Cast Iron Skillet and Oven
- Steak Doneness: A Visual and Temperature Guide
- You’re Now a Steak Master
- Frequently Asked Questions (FAQ)
Why a Cast Iron Skillet and Oven is the Ultimate Combination
So, what’s the big deal about this particular mix? It all comes down to using two different kinds of heat for two different tasks. It’s like a team of experts, with each person doing their job well.
The Magic of Cast Iron
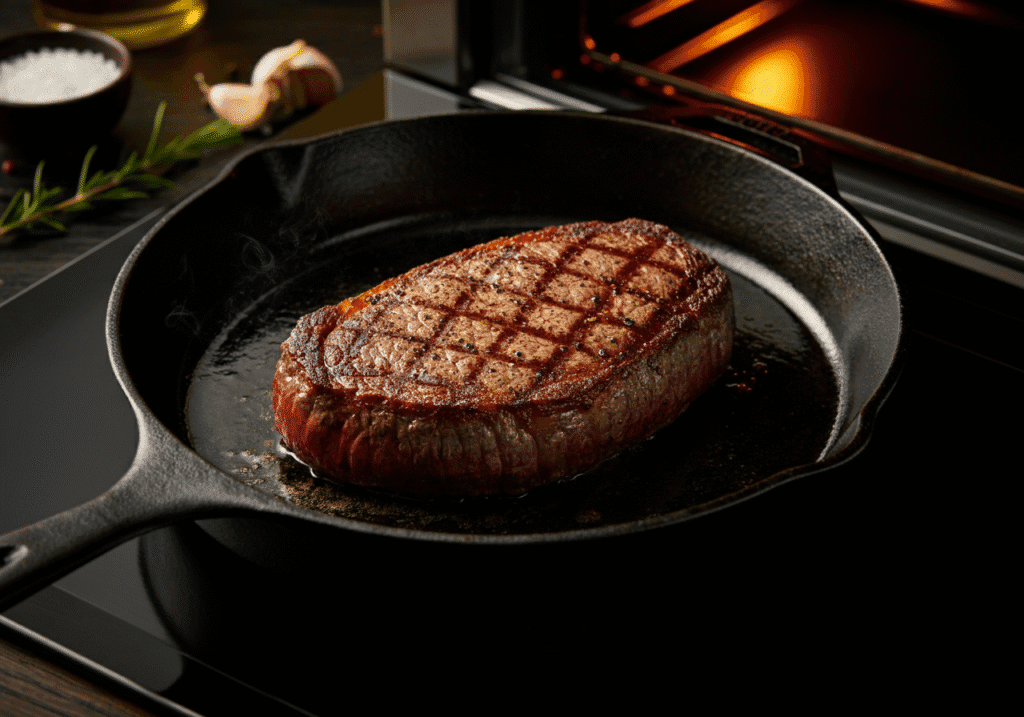
Your non-stick frying pan is great for pancakes, but not so much for steak. To get a truly amazing crust, you need heat that is loud, strong, and steady. This is where cast iron really shines. These heavy pans are great at getting really hot and, even better, staying really hot.
If you put a steak in a cast-iron skillet at the right temperature, the surface temperature doesn’t drop. Instead, it gives off a strong, steady heat that initiates the Maillard reaction, a remarkable chemical process that converts amino acids and sugars into hundreds of new flavour compounds. This is what makes the crust on a great steak so deep brown and full of flavour. Most other pans just can’t keep up.
The Precision of the Oven
The skillet takes care of the outside, and the oven takes care of the inside. After you get that perfect sear, cooking the steak in the oven gives it even, gentle heat all over.
Instead of putting direct heat on the steak from the hob, which can make a thick, overcooked ‘grey band’ just below the crust, the oven cooks it slowly and evenly from all sides. This lets the steak’s internal temperature rise slowly, which gives you a much bigger window of time to take it out at the exact level of doneness you want. It is the key to getting a perfect medium-rare edge-to-edge.
Benefits Summarised:
- Amazing Flavour: The cast iron’s intense sear makes a crust that is both complex and savoury, and there is no other crust like it.
- Perfect Texture: The outside is crispy and delicious, while the inside is soft and juicy, creating the ideal contrast.
- Unmatched Control: This method of searing and baking makes it much easier to avoid overcooking and reach your target temperature, so you don’t have to guess what to do.
Common Challenges When Cooking Steak (And How to Solve Them)
There are some things that can go wrong when you cook a steak. Here’s how to avoid the most common problems with our cast-iron steak recipe.
The Dreaded Grey Band
You know what I mean—the thick, sad, grayish-brown layer of overcooked meat just under the crust. It’s dry, it’s tough, and it’s the enemy of a good steak. This happens when the steak is cooked for too long over very hot, direct heat. The skillet-to-oven method is the perfect solution. The fast, hot sear makes the crust, and the slow, gentle heat of the oven cooks the inside, almost completely getting rid of that grey band.
A Weak, Sad Sear
A steak that looks pale and sickly is a crime against food. A pan that isn’t hot enough or a steak that is too wet are the two most common causes of this disaster. If you preheat cast iron correctly, it will fix the first problem. For the second, the answer is easy: paper towels. Before you put that steak in the pan, pat it dry. Steam is the worst enemy of a good sear because it comes from moisture.
Smoke Alarm Mayhem
- Let’s be honest: cooking a steak well is a smoky job. You might not be doing it right if you don’t see any smoke. But you don’t want to have to call the fire department. To deal with the smoke:
- Use the right kind of oil: Choose an oil with a high smoke point, like avocado, grapeseed, or sunflower oil. Olive oil will burn and taste bad.
Before you start, open a window and turn on your extractor fan to its highest setting. - Get ready: Find out where your smoke detector is. If it goes off a lot, you might want to think about turning it off for a short time and then turning it back on again, but only if you can do that without forgetting to do it.
Step-by-Step: How to Cook Steak in a Cast Iron Skillet and Oven
This is the core of your new steak-cooking life. Follow these steps, and you won’t go wrong. We’re using a ribeye here, but this works for any thick-cut steak.
What You’ll Need
Ingredients:
- 1 thick-cut steak (at least 1.5 inches thick), like a ribeye, sirloin, or fillet
- Coarse sea salt
- Freshly ground black pepper
- 1 tbsp high-smoke-point oil (grapeseed, avocado, etc.)
- 2-3 tbsp unsalted butter
- 2-3 crushed garlic cloves
- A few sprigs of fresh thyme or rosemary
Equipment:
- A 10- or 12-inch cast-iron skillet
- An instant-read meat thermometer (this is non-negotiable!)
- Tongs
Step 1: Prepare the Steak
Get your steak ready first. Get it out of the fridge. What is the big rule? The enemy is moisture. Use paper towels to dry the steak all the way around. Seriously, pat it like you want to learn all its secrets. A dry surface makes a better crust.
Next, add some flavour. And I mean to season it. You need to add more salt to a thick steak than you think. Cover every surface—top, bottom, and all the sides—with coarse salt and freshly ground black pepper. After seasoning, let the steak sit at room temperature for at least 45 minutes, or up to an hour. This does two important things: it allows the salt to penetrate the meat, which infuses it with flavour from the inside, and it warms the steak, which helps it cook more evenly.
Step 2: Preheat Everything
Proper preheating is fundamental. You want your tools ready for battle.
Preheat your oven to 275°F (135 °C).
Put your cast-iron skillet on the stove over high heat and let it heat up for 5 to 10 minutes. Take your time with this part. That pan needs to be very hot. You can tell it’s done when you see a little bit of smoke or when you flick a drop of water on it and it sizzles and disappears right away..
Step 3: The Sear
It’s time for the show. Add a tablespoon of oil with a high smoke point to the hot skillet. It should start to shine right away.
Put the steak in the pan carefully, away from you so that oil doesn’t splash back. It should make a loud, angry noise when it cooks. If it doesn’t, your pan isn’t hot enough. Use your tongs to gently press it down so that it makes full contact with the pan.
Sear for 2-3 minutes per side without moving it. Just let the pan do its work. You’re looking for a deep, rich brown crust. Once both sides are done, use your tongs to hold the steak on its side and sear the edges, especially the fat cap on a ribeye. This renders the fat and adds a ton of flavour.
Step 4: Finish in the Oven
Turn the heat down on the stove. Now it’s time for the flavour bomb. Put the herbs, crushed garlic, and butter in the pan. As the butter melts and starts to foam, tilt the pan towards you and use a spoon to baste the steak with the fragrant, bubbling butter for about 30 seconds.
Immediately transfer the entire skillet into your preheated oven.
Step 5: Cook to Temperature
This is when your meat thermometer really comes in handy. Let the steak cook in the oven for 5-10 minutes. The exact time will depend on how thick it is and how you like it cooked. Start checking the temperature after 5 minutes.
Take the steak out of the oven when it is 5–8 degrees Celsius below the temperature you want it to be.
Internal Temperature Guide (Pull from Oven):
- Rare: 46-48°C (115-120°F)
- Medium-Rare: 51-54°C (125-130°F)
- Medium: 57-60°C (135-140°F)
Step 6: The All-Important Rest
Don’t skip this step! Take the steak out of the pan and put it on a warm plate or cutting board. Now, don’t touch it. Give it 10 minutes to rest. This lets the muscle fibers relax and the juices, which were pushed to the center while cooking, to spread out again throughout the meat. If you cut it too soon, all the tasty juices will run out onto your board.
During this rest, the steak will continue to cook due to ‘carryover cooking’, raising its internal temperature by a few degrees to reach its final perfect state. You can add a last knob of butter on top of the steak while it rests to make it even richer.
Step 7: Slice and Serve
The last obstacle. Cutting the steak against the grain is the best way to make sure it is as tender as possible. If you look closely at the meat, you can see which way the muscle fibers are going. Place your knife at a right angle to those lines and cut. This makes the muscle fibers shorter, which makes each bite very soft.
Serve right away and get ready for the applause. You deserve it.
Steak Doneness: A Visual and Temperature Guide
Use a reliable meat thermometer to be sure. Here’s a guide to final temperatures after resting, based on advice from culinary experts like those at Serious Eats.
| Doneness | Final Internal Temp | Centre Colour and Texture |
|---|---|---|
| Rare | 49-52°C (120-125°F) | Cool red centre, very soft. |
| Medium-Rare | 54-57°C (130-135°F) | Warm red centre, soft and juicy. |
| Medium | 60-63°C (140-145°F) | Warm pink centre, slightly firm. |
| Medium-Well | 65-68°C (150-155°F) | Slightly pink centre, firm. |
| Well-Done | 71°C+ (160°F+) | Little to no pink, very firm. |
You’re Now a Steak Master
Let’s go over the magic recipe again: a thick-cut steak, a very hot cast iron skillet for the crust, and an oven that cooks the inside evenly and gently. This is the perfect three-way for steak.
It’s not hard; you just need to know how to do it and have the right tools, like that all-important meat thermometer.
No more tough, chewy steaks that let you down. You now know how to make a pan-seared steak that will rival anything from your favorite steakhouse. So get that skillet going and show that steak who’s in charge!
Frequently Asked Questions (FAQ)
Q1: Can I use a different cut of steak?
A: Absolutely! This method works beautifully for any thick-cut steak like sirloin, fillet, or rump. The key is thickness. Make sure it’s at least 1.5 inches thick to prevent it from overcooking during the searing stage.
Q2: What if I don’t have a cast iron skillet?
A: The next best thing is a stainless steel pan with a heavy bottom. It can also get very hot, hold heat well, and be used in the oven. Don’t use pans that don’t stick. They can’t handle the high heat needed for a good sear and can let off dangerous fumes if they get too hot.
Q3: Why did my steak turn out tough?
A: There could be a few reasons for this. You probably cooked it too long, which is the most likely reason. Or maybe you didn’t let it sit long enough, which made the juices run out. Last but not least, make sure you’re cutting against the grain. To keep from overcooking, a meat thermometer is your best friend!
Q4: Can I do this process in reverse (oven first, then sear)?
A: Yes! That is a great method known as the “reverse sear.” First, you cook the steak slowly and low in the oven, and then you finish it with a quick, hot sear in the pan. It’s reat for controlling the temperature even more precisely,