
How to Clean OXO Good Grips Vegetable Chopper Safely and Fast
Washing this manual dicer requires lifting out the silicone pusher grid to eject wedged produce, unhinging the upper lid, and pressing the three rear release dots to separate the blade deck from the clear catch container. Once fully disassembled, rinse away loose debris and scrub the stainless steel grid from the underside with a stiff dish brush and warm soapy water, or place every detached piece on the top rack of your dishwasher.
Leaving diced onion, garlic skin, or tomato pulp wedged between the stainless steel cross-blades creates an immediate kitchen headache. Once vegetable starches and sugars dry onto the metal grid and plastic teeth, they harden like cement.
Forcing a standard kitchen sponge across those intersecting razor edges shreds the foam and puts your fingertips millimeters away from a severe laceration. Trapped food residue under the silicone gasket or inside the lid hinge also invites mold growth and lingering sulfur odors that transfer to the next meal you prep.
Breaking the unit down into its individual components takes less than thirty seconds and eliminates the frustration of picking out stubborn food bits one by one. Proper disassembly flushes out hidden crevices effortlessly, protects your fingers from direct contact with the cutting edges, keeps the clear catch bin free of cloudy buildup, and preserves the factory sharpness of the stainless steel grid over years of heavy meal prep.

Kitchen blade accidents happen far more often during cleanup than most home cooks realize. According to a 2026 analysis of U.S. Consumer Product Safety Commission (CPSC) National Electronic Injury Surveillance System data from 2023 through 2025, kitchen tools and cooking appliances send an estimated 436,000 Americans to hospital emergency departments each year, with 84% of those visits caused by cuts and lacerations from sharp blades, slicers, and choppers rather than burns. Treating the dicer’s blade cartridge with the same caution as a chef’s knife is the simplest way to stay out of that statistic.
What stood out to me while reviewing the official OXO care documentation is how many owners miss the three small textured release dots on the back of the container, leaving the main collar attached and trapping dirty dishwater along the rim.
When looking into how to clean oxo good grips vegetable chopper units properly, I also noticed that the manufacturer sells both the rectangular Easy-Pour lid dicer and the round plunger-style slap chopper under similar product names, and each model comes apart differently.
Whether you need to clear mashed avocado out of the square pusher teeth or unscrew the rotating blade cartridge on the cylindrical plunger version, using the right release sequence prevents cracked plastic tabs and sliced knuckles. Below, you will find the exact disassembly steps for both OXO chopper styles, safe hand-washing and dishwasher techniques, methods for removing dried-on food and stubborn onion smells, and the correct drying and reassembly routine.
Identifying Which OXO Chopper Model You Own
Before pulling on plastic tabs or twisting the housing, take a second to confirm which design sits on your counter. In my research across manufacturer manuals and replacement part listings, I found that confusion over how to clean oxo good grips vegetable chopper components almost always happens because OXO produces two completely different mechanical styles under the Good Grips banner. Applying twisting force to a snap-fit lid—or prying on a threaded collar—can snap the polymer locking lugs.
The Lever-Style Vegetable Chopper With Easy-Pour Opening
The lever-style dicer is a rectangular box featuring a hinged top lid with a black soft-touch pressure pad, a square stainless steel dicing grid, and a clear 2.5-cup catch container with a rear pour spout. When you push the lid down, a black rubberized grid of square teeth presses the onion or bell pepper straight through the stationary blade mesh below. This model relies on friction hinges and snap-fit tabs rather than screw threads.
The Plunger-Style Spring Chopper
The plunger-style unit is a tall, cylindrical tube with a large spring-loaded black knob on top, an internal W-shaped rotating blade cartridge, a plastic wiper ring, and a round clear cup with a rubberized base cap. Every time you slap or press the top knob downward, the blade assembly indexes slightly to chop nuts, herbs, or garlic inside the cup. Cleaning this version requires locking the spring mechanism and unscrewing threaded components.
| Design Feature | Lever-Style Easy-Pour Chopper | Plunger-Style Spring Chopper |
| Body Shape | Rectangular box with rear pour opening | Cylindrical tower with round base cup |
| Cutting Mechanism | Stationary square stainless steel grid | Rotating W-shaped spring blade cartridge |
| Food Ejector Part | Removable silicone pusher grid with teeth | Slotted plastic blade wiper / stripper ring |
| Disassembly Method | Snap-fit grid, lift-off hinge, 3-dot release tab | Clockwise knob lock, counterclockwise unscrewing |
| Dishwasher Rating | Top-rack dishwasher safe | Top-rack dishwasher safe |
Key Takeaway: Confirm whether you have the rectangular hinged dicer or the round spring-plunger chopper first, as the rectangular model snaps apart via release tabs while the round model unscrews after locking the top knob.
How to Disassemble the OXO Vegetable Chopper Before Washing
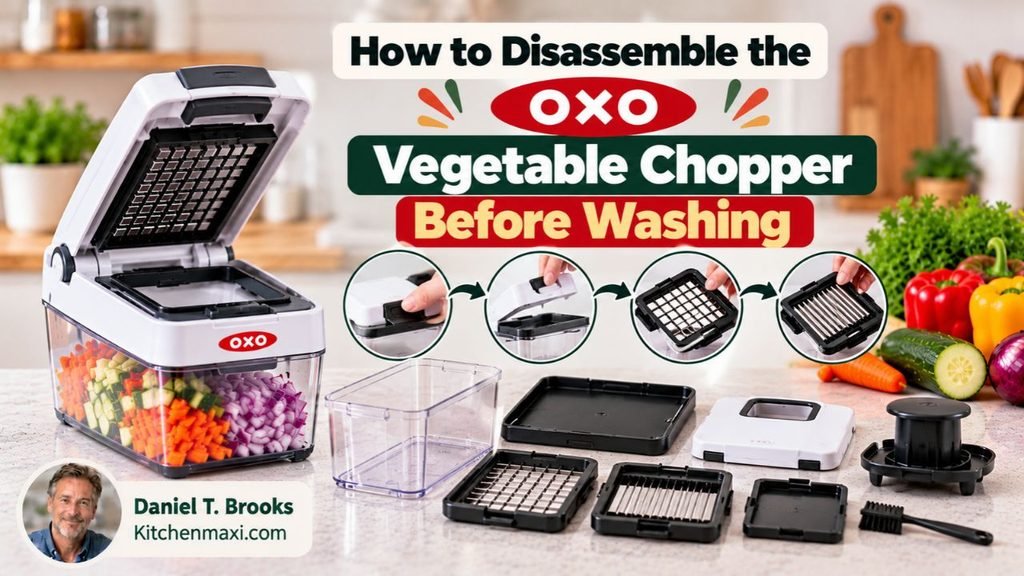
Washing an assembled chopper traps fibrous pulp inside the hinge pins, under the blade rim, and between the pusher teeth. Separating every component takes only a few seconds and exposes all food-contact surfaces to water and detergent.
Safety Tip: Always empty the catch cup and keep your fingers on the outer plastic margins or textured grip pads during disassembly. Never press your palm or thumb against the stainless steel grid to gain leverage.
Taking Apart the Rectangular Hinged Vegetable Chopper
From the official OXO instruction manual I reviewed, the rectangular dicer breaks down into five distinct washable pieces without requiring any tools:
- Pull out the upper cleaning grid: Flip the top lid completely open. Grip the flexible black pusher grid located on the underside of the lid and pull it straight out of its recess. Lifting this grid free automatically pushes out most of the vegetable skins and cube fragments trapped between the black teeth.
- Lift off the stainless steel blade cartridge: Hold the plastic side tabs framing the metal dicing grid and lift the blade insert straight up and out of the main collar. Set it down flat with the sharp cutting edges facing the counter.
- Separate the hinged lid from the collar: Open the lid to an upright roughly 90-degree angle relative to the white body collar, then pull straight up to unhook the hinge pins from their slots.
- Release the white body collar from the clear container: Look at the back of the clear catch container directly beneath the Easy-Pour opening. Press inward firmly with your thumb on the three raised dots molded into the plastic while lifting the white upper collar upward to unsnap it from the clear bin.
- Peel off the non-slip base ring (if needed): If liquid or sticky juice has seeped under the bottom elastomer ring, gently check the base so soap and water can reach the underside of the container.
Taking Apart the Round Plunger Chopper
If you own the cylindrical plunger model, the internal spring must be secured before you touch the blade housing:
- Twist off the clear collection cup: Hold the white upper body with one hand and twist the clear bottom cup and its black-and-white base cover counterclockwise to detach them.
- Pull off the blade wiper: Grip the side tabs on the slotted plastic wiper (also called the stripper ring) and slide it carefully downward off the metal blades. Doing this right away scrapes excess onion or herb fragments off the metal surfaces.
- Lock the plunger knob down: Place the white body on a flat counter, press the black plunger knob all the way down, and rotate the knob clockwise until you see the indicator dot align with the lock graphic. This holds the blades extended and stationary so the shaft cannot spin while you unscrew it.
- Unscrew the blade cartridge: Hold the white chopper housing firmly in one hand. Using your other hand, grip the plastic side tabs on the blade cartridge—never the metal blades—and turn the cartridge counterclockwise until it unscrews completely from the central plunger shaft.
Key Takeaway: Always remove the silicone tooth grid and press the three rear release dots on the rectangular dicer—or lock the plunger knob clockwise and unscrew the blade cartridge by its plastic side grips on the round chopper—before introducing water.
How to Clean OXO Good Grips Vegetable Chopper by Hand

Hand-washing is my recommended method whenever you want the stainless steel blades to stay razor-sharp for years and the clear styrene-acrylonitrile (SAN) or Tritan plastic container to remain crystal clear. Automatic dishwashers expose metal edges to harsh enzymatic detergents and prolonged high heat, whereas a two-minute sink wash cleans the tool gently and makes it immediately available for your next recipe.
Tools and Supplies Needed for Sink Washing
Before turning on the faucet, gather a few simple sink tools so you are not reaching for items with wet, soapy hands while holding an exposed blade grid:
- Stiff-bristled nylon dish brush or a long-handled bottle brush
- Clean toothpick, wooden skewer, or plastic scraper (sometimes included with multi-blade dicer sets)
- Mild liquid dish soap (such as standard grease-cutting dish detergent)
- Soft non-abrasive microfiber cloth or cellulose sponge
- Clean drying towel or open dish drying rack
Step-by-Step Hand-Washing Procedure
Follow this sequence to clean every piece thoroughly without putting your fingers near the cutting mesh:
- Flush away loose produce immediately after chopping: Hold the disassembled blade grid and silicone pusher grid under a strong stream of lukewarm tap water within a few minutes of finishing your meal prep. Direct the water blast against the flat underside of the stainless steel blade grid so wedged vegetable pieces are pushed backward out of the wider entry side of the blades rather than forced deeper into the tapered cutting edge.
- Dislodge stubborn fibers from the pusher teeth: Inspect the removable black silicone cleaning grid. If thin tomato skins or papery onion layers remain caught between the square pegs, flex the rubberized grid slightly with your fingers or run a wooden toothpick along the rows while rinsing under running water.
- Brush the stainless steel blade grid safely: Apply a drop of liquid dish soap to your stiff-bristled nylon dish brush. Hold the blade insert securely by one outer plastic tab resting flat against the bottom of the sink, and scrub across and down through the metal squares from both sides using the brush bristles. Keep sponges and dishcloths away from the metal grid, as the sharp intersections slice right through soft foam.
- Wash the lid, collar, and catch container: Use a soft, soapy sponge to wash the clear catch bin, the white upper collar, the hinged lid, and the rear Easy-Pour opening. Pay special attention to the recessed groove where the white collar snaps onto the container and the circular hinge sockets where vegetable juice often collects.
- Rinse with warm clean water: Rinse all five components thoroughly under warm running water until every trace of soap suds and slick detergent film disappears.
Helpful Insight: Always push stuck food out from the bottom of the blade grid toward the top. The stainless steel blades are beveled on the top edge to slice downward; pushing debris upward works with the taper of the metal and prevents fragments from binding tighter.
Key Takeaway: Rinse the disassembled parts immediately after use, flush the blade grid from the bottom side, and use a long-handled nylon brush rather than a hand sponge to scrub between the stainless steel squares.
Washing the OXO Vegetable Chopper in the Dishwasher

If you just diced a mountain of mirepoix, peppers, and potatoes and prefer hands-off cleanup, OXO designs every component of both the rectangular vegetable chopper and the round spring chopper to be top-rack dishwasher safe. Placing the tool in the dishwasher works well when you follow a few placement and temperature precautions.
Proper Rack Placement and Pre-Rinsing
Never place an assembled chopper straight into the dishwasher. Water jets cannot penetrate between the black pusher teeth and the metal blade mesh when the lid is closed, baking wet vegetable starches onto the plastic during the drying cycle.
Separate all pieces completely and flick out any large chunks of onion or celery. Place the blade cartridge, the removable silicone cleaning grid, the hinged lid, the white collar, and the clear catch container on the top rack only. Lay the blade insert flat or secure it between top-rack tines so water jets cannot flip it around against glassware.
Cycle Settings to Avoid Warping and Clouding
The exposed heating coil at the bottom of most residential American dishwashers radiates intense heat during the wash boost and heated dry stages. Keeping all chopper parts on the upper rack protects the clear plastic bin from warping out of alignment and prevents the flexible black pusher grid from losing its snap-fit tension.
I recommend turning off the Heated Dry or Sanitize Boost option if your dishwasher runs unusually hot, and avoiding abrasive lemon-scented gel detergents that etch clear plastics over time. Once the wash cycle finishes, open the dishwasher door to let steam escape.
| Cleaning Factor | Hand-Washing with a Brush | Top-Rack Dishwasher Cycle |
| Active Effort | 2 to 3 minutes at the sink | 30 seconds to disassemble and load |
| Blade Edge Longevity | Preserves razor edge indefinitely | Gradual dulling over many high-heat cycles |
| Plastic Clarity | Keeps catch cup crystal clear | Can develop slight etching over years of use |
| Stuck-On Debris Removal | Immediate targeted bristle scrubbing | Requires pre-clearing grid teeth before loading |
| Best Situation | Daily quick prep, garlic, avocados, soft foods | Heavy batch cooking when running a full load |
Key Takeaway: Disassemble all five pieces and clear wedged vegetable chunks before loading everything exclusively onto the top rack of your dishwasher, ideally with the heated dry cycle turned off.
Removing Dried-On Food, Stains, and Stubborn Odors
Even in a well-organized kitchen, a dirty vegetable chopper occasionally gets pushed to the back of the counter until the next morning. When you return to a grid crusted with hardened potato starch, orange beta-carotene stains from carrots, or pungent garlic oil, scrubbing harder with a brush increases the chance of a slip. Let chemistry and warm water do the heavy lifting instead.
Softening Hardened Vegetable Starch and Skins
Do not try to gouge petrified onion skin out of the metal grid with a metal fork or knife tip, which bends the thin stainless steel cross-blades and ruins the alignment with the top pusher teeth.
Place the disassembled blade insert and silicone cleaning grid into a shallow bowl or plastic tub—never loose at the bottom of a sink full of murky dishwater where someone might reach in blindly. Cover the parts with warm water and a teaspoon of dish soap for 15 to 20 minutes. Once the dried cellulose and starch rehydrate and swell, lift the parts out by their plastic tabs and brush the softened residue away effortlessly under running tap water.
Eliminating Onion and Garlic Odors
Alliums like onions, shallots, and garlic release sulfur compounds such as allicin that bond stubbornly to silicone pusher grids and plastic catch containers. If your chopper smells like raw salsa even after a thorough wash, dissolve two tablespoons of baking soda in a quart of warm water and submerge the disassembled plastic and silicone components for 30 minutes. Alternatively, wipe the clear container and black rubber grid with a solution of equal parts white distilled vinegar and warm water, then rinse with cool water.
Tip: When rinsing away raw onion or garlic juice right after chopping, start with cold tap water before switching to warm soapy water. Hot water can set aromatic sulfur oils into porous silicone and microscopic scratches in plastic.
Lifting Tomato, Carrot, and Turmeric Stains
Pigments like lycopene in tomatoes and carotene in carrots are fat-soluble rather than water-soluble, which is why plain water leaves an orange or reddish tint on the white plastic collar. Rub a drop of cooking oil or olive oil over the stained white plastic with a paper towel to dissolve the fat-soluble pigment, then wash the oil and stain away together using warm water and grease-cutting dish soap. A gentle paste of baking soda and water rubbed onto the white plastic with a soft cloth also lifts surface discoloration without scratching.
Key Takeaway: Soak crusted parts in a dedicated shallow bowl of warm soapy water for 15 minutes rather than scraping blades with metal tools, neutralize sulfur smells with baking soda, and lift orange vegetable stains with a drop of cooking oil followed by dish soap.
Drying, Reassembling, and Storing Your Chopper
Putting a damp vegetable chopper back together and closing the lid traps moisture inside a sealed chamber. Over a few days in a dark kitchen cabinet, residual water droplets can leave mineral spots on the stainless steel blades and cause a musty odor inside the catch cup.
Drying Hidden Crevices
After washing, shake excess water off the blade cartridge and the square silicone tooth grid. Place all components upright on a well-ventilated drying rack with plenty of airflow. While the clear container and white collar can be wiped bone-dry with a lint-free dish towel, allow the stainless steel blade mesh and the deep grid recesses to air-dry completely rather than pressing a towel into the sharp metal squares.
Step-by-Step Reassembly
Once every piece is dry to the touch, snap the unit back together in reverse order:
- Snap the white collar onto the clear container: Align the Easy-Pour opening on the white collar with the rear cutout of the clear catch bin, then press down firmly until the three rear dots click into place.
- Reattach the hinged lid: Hold the lid upright at a 90-degree angle, align the hinge pins with the slots on the rear of the white collar, and press down until the hinge engages smoothly.
- Seat the silicone cleaning grid: Press the flexible black tooth grid firmly back into the underside of the top lid until it sits completely flush.
- Drop in the blade cartridge: Holding the plastic side tabs, lower the stainless steel blade grid into the recessed frame on the white collar so it lies flat and level.
If you are reassembling the round plunger chopper, keep the top black knob locked in the down position, hold the white body in one hand, screw the blade cartridge clockwise onto the central shaft using its plastic side grips, slide the slotted plastic wiper over the blades along the side guides, and twist the clear cup and base cap back onto the bottom.
Pro Tip: Before storing the rectangular chopper in a drawer, close the lid gently to verify that the black pusher teeth pass smoothly through the metal blade squares without catching. If the lid resists closing, open it immediately and check that the silicone grid is pushed all the way into its recess and the blade insert isn’t rotated backward.
Key Takeaway: Let the blade cartridge and silicone grid air-dry completely before snapping the collar, lid, pusher teeth, and blade insert back into alignment for safe cabinet storage.
Common Cleaning Mistakes That Damage the Chopper or Cause Cuts
Have you ever noticed hairline cracks around the hinge or bent teeth on a manual food dicer after just a few months of ownership? In almost every case, those failures trace back to simple cleanup habits rather than actual vegetable chopping. Avoiding five frequent missteps will protect both your hands and the tool:
- Prying on the lid with the cleaning grid still jammed with hard food: Trying to yank the lid off at an awkward angle when thick carrot pieces are wedged between the blade and pusher teeth puts lateral torque on the hinge pins. Always open the lid straight up first.
- Forgetting the three rear release dots: Pulling straight up on the white collar without depressing the three textured dots under the rear pour opening wears down the locking tab and can crack the clear catch bin.
- Dropping the loose blade insert into a soapy sink: Submerging sharp blades in cloudy dishwater is one of the fastest ways to suffer a deep fingertip cut when reaching into the basin. Keep the blade grid on the counter next to the sink until the exact moment you rinse and brush it.
- Scrubbing the clear catch container with steel wool or scouring pads: Green heavy-duty scouring pads and abrasive cleanser powders carve thousands of tiny scratches into clear plastic, turning the transparent measuring bin permanently hazy and trapping food odors.
- Leaving the plunger unlocked on the round chopper during blade removal: Attempting to unscrew the W-blade cartridge on the spring chopper while the top knob is unlocked allows the shaft to spin or snap upward unexpectedly.
Conclusion
Mastering how to clean oxo good grips vegetable chopper components comes down to full disassembly and keeping your hands clear of the stainless steel cutting edges. By lifting out the flexible black pusher grid, unhinging the lid, and pressing the three rear release dots to separate the collar from the catch cup, you eliminate every hidden pocket where diced produce and moisture hide.
Whether you prefer a quick two-minute sink scrub with a stiff nylon dish brush or loading the separated pieces onto the top rack of your dishwasher, flushing the blade mesh from the underside right after meal prep prevents vegetable starches from hardening. When stubborn onion odors or carrot stains appear, a brief soak in baking soda or a dab of cooking oil restores the plastic without harsh abrasives.
My recommendation is to rinse the blade insert and silicone tooth grid under running tap water the moment you finish transferring your chopped vegetables to the skillet. Taking twenty seconds to flush away fresh pulp while it is still wet makes the rest of your cleanup effortless and keeps your chopper ready for the next meal.
FAQs About Cleaning an OXO Vegetable Chopper
How do you get stuck food out of the OXO vegetable chopper grid?
Pull the black silicone pusher grid straight out from the underside of the top lid. Removing this flexible insert automatically pushes out most of the trapped vegetable cubes and skins stuck between the square teeth. For any remaining fibers wedged in the stainless steel blade mesh, hold the blade insert upside down under running water and scrub from the bottom side using a stiff-bristled nylon dish brush or a wooden toothpick.
How does the top come off the OXO Good Grips vegetable chopper?
First, open the top lid completely to a vertical 90-degree angle and lift straight up to unhook it from the hinge slots. Next, look at the back of the clear catch container directly underneath the rear Easy-Pour opening. Press inward firmly with your thumb on the three raised plastic dots while lifting the white upper collar upward to release it from the clear bin.
Can the OXO vegetable chopper go in the dishwasher?
Yes, all detachable components of the OXO Good Grips Vegetable Chopper are top-rack dishwasher safe. Before loading, disassemble the unit completely by removing the silicone tooth grid, lifting out the stainless steel blade insert, unhinging the lid, and detaching the white collar from the catch cup. Keep all pieces on the top rack away from the bottom heating element, and wash by hand if you want to maximize long-term blade sharpness.
Why won’t the blade unscrew on my round OXO plunger chopper?
On the cylindrical spring-loaded OXO Chopper, the internal shaft will spin freely unless you engage the plunger lock first. Twist off the bottom clear cup, remove the plastic blade wiper, press the black top knob all the way down, and turn the knob clockwise until the dot aligns with the lock symbol. Once locked, grip the plastic side tabs on the blade cartridge and turn counterclockwise to unscrew it.
Can I use bleach to sanitize my OXO vegetable chopper?
Avoid soaking the stainless steel blade cartridge or the black rubberized grips in chlorine bleach, as bleach can pit and corrode stainless steel cutting edges and degrade soft-touch elastomers over time. Washing thoroughly with warm water and grease-cutting dish soap—or running the disassembled parts through a standard top-rack dishwasher cycle—cleans the vegetable chopper safely without damaging the materials.
How do I keep the clear plastic chopper container from getting cloudy?
Cloudiness on the clear catch bin happens when hard water minerals bake onto the plastic during heated dishwasher drying cycles or when the surface is scrubbed with abrasive scouring pads. To keep the container crystal clear, wash it by hand with a soft microfiber cloth and mild dish soap, or wipe it down occasionally with white distilled vinegar to dissolve hard water film before rinsing and towel-drying.