How to Maintain Wood Cutting Board: Cleaning, Oiling, and Care
Maintain a wooden cutting board by washing it soon after use, drying every surface thoroughly, conditioning the wood with food-grade mineral oil whenever it starts looking dry, and storing it where air can reach both sides. Avoid soaking, dishwasher cycles, harsh scrubbing, and leaving one side wet for long periods because those habits can encourage warping, cracking, and rough grain.
Wood reacts to moisture differently from plastic or glass. Repeated wetting and drying makes the fibers expand and contract, so daily cleaning habits have a direct effect on the board’s shape and surface condition.
Regular oiling adds another layer of care. Mineral oil soaks into dry wood and reduces how quickly the board takes up moisture during washing, but piling oil onto an already saturated board only leaves a greasy surface.
For how to maintain wood cutting board, the main routine is simple: clean after food preparation, dry promptly, oil when the wood begins looking pale or thirsty, deal with odors and stains before they become stubborn, and inspect the surface for deep cracks or hard-to-clean grooves.
Grain construction also changes maintenance slightly. End-grain boards tend to absorb more oil, while edge-grain boards usually require less during each conditioning session. Thick butcher blocks also need attention on the bottom, sides, ends, and handle openings rather than only the cutting face.
A good maintenance routine covers daily washing, proper drying, periodic mineral oil, occasional surface restoration, careful storage, and replacement once damage becomes too deep to clean reliably.
How to Maintain Wood Cutting Board After Daily Use
Daily maintenance starts as soon as food preparation ends.
Remove Food Residue Promptly
Scrape away:
- Vegetable pieces
- Meat residue
- Dough
- Cheese
- Herbs
- Oil
- Sauce
before residue dries onto the wood.
A bench scraper or soft plastic scraper works well for stubborn food particles without requiring aggressive abrasion.
Wash the Wood Cutting Board
Use warm water, dish soap, and a soft sponge or cloth.
Clean:
- Top
- Bottom
- Sides
- Ends
- Juice groove
- Handle openings
The bottom deserves attention even if food did not touch it because moisture and food residue can travel underneath during preparation.
Rinse Away Soap
Rinse briefly rather than leaving the board submerged.
Standing water can move deeper into the grain and increase dimensional movement as the board dries.
Dry the Board Immediately
Remove surface water with a clean towel.
Then leave the board where air can circulate around it.
Key Takeaway: Daily wood cutting board maintenance is mainly about quick cleaning, limited water exposure, and complete drying on every surface.
How to Wash a Wood Cutting Board Without Damaging It

Wood should be cleaned thoroughly without being saturated with water.
Use Warm Soapy Water
A mild dish detergent is sufficient for routine cleaning after most foods.
Scrub the entire working surface and any grooves where food can collect.
Wash Both Faces When Needed
If the cutting face becomes wet during cleaning, lightly cleaning and drying the other face can reduce large moisture differences between the two sides.
You do not need to soak both sides.
Do Not Leave the Board in the Sink
Avoid leaving a wooden board:
- Under standing water
- In a full sink
- Covered with a wet towel
- Sitting on a soaked countertop
Long water exposure encourages swelling.
Avoid the Dishwasher Unless the Maker Specifically Approves It
A dishwasher exposes wood to prolonged water, detergent, and heat.
That combination may lead to:
- Warping
- Splitting
- Glue-joint failure
- Rough grain
Some boards may have different manufacturer instructions, so product-specific care directions take priority.
Key Takeaway: Wash a wooden cutting board quickly with warm soapy water, rinse it briefly, and avoid prolonged soaking or dishwasher exposure.
How to Dry a Wood Cutting Board After Washing
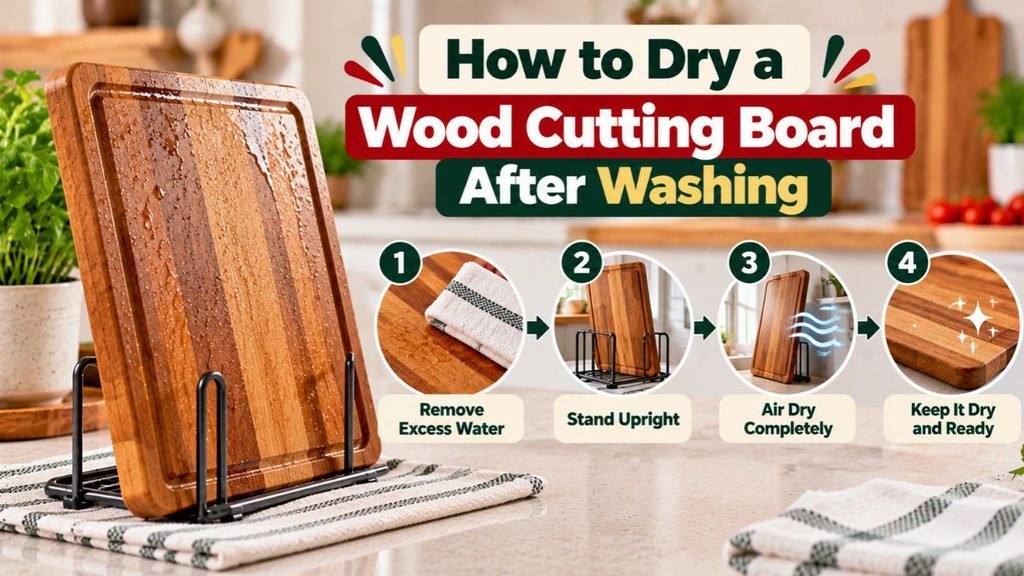
Drying is just as important as washing.
Towel-Dry the Surface First
Use a clean dry towel to remove visible water.
Pay attention to:
- Juice grooves
- End grain
- Handle cutouts
- Corners
Water can remain in recessed areas long after the main surface appears dry.
Stand the Board Upright
After towel drying, place the board on its edge or in a rack.
This gives both large faces access to air.
Avoid Drying It Flat on a Wet Counter
A board lying flat may dry rapidly on top while the bottom stays damp.
That moisture imbalance can contribute to cupping.
Keep It Away From Strong Heat
Do not dry the board directly against:
- Radiator
- Stove
- Heater
- Very hot oven
- Strong heat vent
Rapid uneven drying can place extra stress on the wood.
Key Takeaway: Towel-dry first, then air-dry the wood cutting board on its edge so moisture can leave both faces at a similar rate.
How Often to Oil a Wood Cutting Board

There is no fixed oiling schedule that fits every board.
The appearance and feel of the wood provide better clues than the calendar.
Oil a New Wood Cutting Board More Heavily
A new untreated board may absorb several applications during its first conditioning.
About 3–5 applications is a common starting range for a dry new board.
End-grain boards may absorb more.
Oil a Used Board When It Starts Looking Dry
Signs include:
- Pale areas
- Dry-looking ends
- Rougher texture
- Uneven color
- Water soaking into the wood quickly
A regularly maintained board often needs only one application during routine conditioning.
Frequent Washing Means More Frequent Oiling
A board used and washed every day may dry out faster than one used occasionally.
Climate also changes the interval.
Dry indoor air can make wood lose moisture more quickly.
Key Takeaway: Oil a wood cutting board when it begins looking dry rather than relying on a rigid schedule; routine maintenance normally requires one coat at a time.
How to Apply Mineral Oil to a Wood Cutting Board
Use food-grade mineral oil intended for cutting boards or butcher blocks.
Start With a Clean, Dry Board
Do not oil immediately after washing.
Let the wood dry completely first.
Oil applied over damp wood may not absorb evenly.
Spread Mineral Oil Across the Cutting Surface
Apply enough oil to leave the surface visibly wet.
Spread it with a clean cloth or applicator.
Oil the Bottom and Edges
Condition:
- Top
- Bottom
- Sides
- End grain
This keeps the treatment more balanced.
Let the Mineral Oil Absorb
Leave the oil on for several hours.
For a new or very dry board, overnight soaking is practical.
Wipe Away Excess Oil
Buff the surface with a clean dry cloth.
The board should feel conditioned rather than greasy.
Repeat Only if the Wood Still Looks Dry
If the oil disappears rapidly and dry patches remain, apply another coat.
Stop when absorption slows and the surface stays evenly conditioned.
Key Takeaway: Apply food-grade mineral oil to every exposed wood surface, let it soak in, then wipe away everything the board does not absorb.
How to Maintain an End-Grain Wood Cutting Board

End-grain boards expose the ends of wood fibers on the cutting surface.
That changes how they absorb moisture and oil.
End Grain Usually Absorbs More Oil
A new end-grain board may need several oil applications before it becomes saturated.
The ends and corners may remain especially thirsty.
Keep Every Surface Conditioned
Do not focus exclusively on the patterned top.
Treat:
- Cutting face
- Bottom
- Sides
so the board does not develop a large moisture difference between surfaces.
Watch Glue Lines and Blocks
End-grain boards contain many glued joints.
Inspect periodically for:
- Gaps
- Separation
- Cracks
A structural split that traps food may justify replacement rather than continued oiling.
How to Maintain an Edge-Grain Wood Cutting Board
Edge-grain boards expose the long sides of wood fibers.
They usually absorb oil less aggressively than end-grain boards.
Apply Less Oil at a Time
Several thin applications during the first conditioning are easier to control than flooding the surface.
Watch for Knife Grooves
Long knife marks can develop across frequently used areas.
Light sanding may restore shallow surface wear.
Deep grooves that cannot be cleaned properly deserve closer inspection.
Treat End Sections Carefully
Even on an edge-grain board, exposed end grain around the perimeter can absorb more moisture and oil than the main face.
Key Takeaway: End-grain boards often need more oil, while edge-grain boards usually need less; both should be cleaned, dried, and conditioned on every exposed surface.
How to Maintain a Wood Cutting Board After Raw Meat

A wood cutting board used for raw meat, poultry, or seafood needs prompt cleaning.
Remove Raw Food Residue Immediately
Do not let meat juices dry on the board.
Move prepared food away and clean the board before placing ready-to-eat ingredients on the same surface.
Wash With Soap and Water
Clean the entire food-contact area thoroughly.
Pay close attention to:
- Knife grooves
- Juice channels
- Corners
Sanitize When Needed
If sanitizing the board after raw animal foods, use a sanitizer approved for food-contact surfaces and follow its label directions.
The sanitizer should not replace normal washing.
Cleaning removes physical food residue first.
Consider Separate Cutting Boards
Using one board for foods such as:
- Raw poultry
- Raw meat
- Raw seafood
and another for:
- Bread
- Fruit
- Salad ingredients
- Ready-to-eat foods
reduces the chance of transferring raw-food residue to food that will not be cooked.
Key Takeaway: Clean a wooden board promptly after raw animal foods, sanitize with a food-contact-safe product when needed, and avoid transferring residue to ready-to-eat ingredients.
How to Remove Odors From a Wood Cutting Board
Foods such as garlic, onion, fish, and strong spices can leave odors behind.
Wash the Board First
Start with normal soap-and-water cleaning.
Many mild odors disappear after the board dries completely.
Use Baking Soda for Persistent Odors
A small amount of baking soda with water can be made into a gentle paste.
Rub it lightly across the affected area, rinse, and dry the board promptly.
Lemon Can Be Used Carefully
Lemon is often used to freshen wood surfaces.
Rub a cut lemon lightly over the board, then wash and dry it.
Do not leave acidic juice sitting on the wood for a long period.
Oil After the Board Is Fully Dry
Repeated cleaning can leave the board looking dry.
If that happens, condition it after all moisture has evaporated.
Key Takeaway: Wash first, treat stubborn odors gently, dry completely, and re-oil only if odor removal leaves the wood noticeably dry.
How to Remove Stains From a Wood Cutting Board
Cutting boards can pick up color from ingredients such as:
- Beets
- Berries
- Tomatoes
- Turmeric
- Leafy herbs
Many stains are cosmetic.
Clean Fresh Stains Quickly
Fresh pigment is easier to remove before it has time to settle deeper into the grain.
Try Mild Surface Cleaning First
Use dish soap and a non-abrasive sponge.
Avoid starting with harsh chemicals.
Use Baking Soda for Light Surface Stains
A gentle baking-soda paste can lift some discoloration.
Rub lightly rather than grinding aggressively into the grain.
Sand Persistent Surface Staining Only When Needed
If the stain remains after normal cleaning and the board surface is otherwise sound, light sanding can expose fresh wood.
Recondition the board afterward.
When to Sand a Wood Cutting Board
Light sanding can restore a board that has become rough or heavily marked.
Sand a Board With Raised Grain
Repeated washing can make fibers stand up.
If the cutting surface feels fuzzy or rough even after drying, light sanding can smooth it again.
Sand Shallow Knife Marks
Minor scratches and shallow grooves can often be removed.
Do Not Sand Away Serious Structural Damage
Do not treat sanding as a solution for:
- Deep splits
- Loose glued blocks
- Major warping
- Mold extending into cracks
- Large contaminated grooves
Those problems may make replacement a better option.
Use Progressively Finer Sandpaper
A common restoration process starts with a medium-fine grit sufficient to remove marks and finishes with finer paper to smooth the wood.
Sand with the grain on edge-grain and face-grain boards.
End-grain surfaces may require more even multi-directional sanding because the fiber ends face upward.
Remove Sanding Dust
Wipe or vacuum the surface thoroughly before oiling.
The board should be clean and dry before mineral oil is reapplied.
Key Takeaway: Sand a wood cutting board for shallow scars or raised grain, then remove all dust and recondition the freshly exposed wood with food-grade mineral oil.
How to Prevent a Wood Cutting Board From Warping
Warping often starts with uneven moisture.
Keep Water Exposure Short
Wash the board rather than soaking it.
Dry Both Sides
Do not leave one face wet against the countertop.
Store the Board With Airflow
Air movement around both faces reduces uneven drying.
Oil the Whole Board
Conditioning only one surface creates an imbalance between the treated and untreated sides.
Keep the Board Away From Extreme Heat
Do not place it next to direct heat to speed drying.
Fast drying on one face can encourage movement.
Key Takeaway: Balanced moisture is the main defense against warping, so wash briefly, dry both faces, condition all sides, and store the board with airflow.
How to Prevent Cracks in a Wood Cutting Board
Cracks often develop after repeated moisture swings or severe drying.
Do Not Let the Board Become Extremely Dry
Apply mineral oil once the wood starts looking pale and dry.
Avoid Long Soaks
Waterlogged wood expands.
When it later dries, large dimensional changes can stress joints and fibers.
Avoid Sudden Temperature Changes
Do not move a wet wooden board directly to intense heat.
Inspect Glue Joints
Laminated and end-grain boards should be checked for separating joints.
A small surface line may worsen if water enters it repeatedly.
Do Not Use a Cracked Board for Food Prep
Deep cracks can trap moisture and food where normal cleaning cannot reach.
How to Store a Wood Cutting Board Properly
Storage should let the board remain dry between uses.
Store the Board Upright
A rack or vertical slot works well.
Air can reach both cutting faces.
Leave Space Between Multiple Boards
Do not pack damp boards tightly together.
Avoid Damp Cabinets
A poorly ventilated cabinet can keep moisture trapped near the wood.
Do Not Put the Board Away Wet
Let it dry completely before placing it into enclosed storage.
Keep It Flat Only When Fully Dry
A large butcher block can be stored flat if the surface underneath is dry and air circulation is adequate.
Key Takeaway: Store a completely dry wood cutting board where air can reach it, with upright storage being a practical choice for many removable boards.
What Oil to Use for Wood Cutting Board Maintenance
The simplest option is food-grade mineral oil.
It is commonly used because it does not turn rancid like many cooking oils.
Mineral Oil
Use a product labeled for:
- Cutting boards
- Butcher blocks
- Food-contact wood
Cutting Board Conditioner
Some products combine mineral oil with beeswax.
These conditioners can leave a slightly more water-resistant surface feel after the wood has already been oiled.
Avoid Common Cooking Oils
Oils such as:
- Olive oil
- Standard vegetable oil
- Canola oil
can oxidize and develop unpleasant odors.
Do not assume an oil is suitable simply because it is edible.
Mineral Oil vs Board Wax for Wood Cutting Board Maintenance
Mineral oil and wax serve different purposes.
Mineral Oil Soaks Into Wood
It conditions dry wood fibers.
For a new dry board, mineral oil should usually come first.
Board Wax Stays Near the Surface
Board wax can reduce how quickly water contacts the wood during normal use.
Many formulas use beeswax mixed with mineral oil.
Use Wax After Oiling
A practical routine is:
- Clean and dry the board.
- Apply mineral oil.
- Let the oil absorb.
- Wipe away excess.
- Apply board wax if desired.
- Buff the surface.
Wax does not replace cleaning or drying.
Key Takeaway: Mineral oil conditions the wood internally, while board wax adds surface protection after the board has already absorbed enough oil.
What Not to Do When Maintaining a Wood Cutting Board
Several habits shorten the life of a wooden board.
Do Not Soak It
Long soaking encourages excessive moisture absorption.
Do Not Store It Wet
Trapped moisture can lead to distortion and unwanted odors.
Do Not Use Cooking Oil as a General Conditioner
Many food oils can become rancid.
Do Not Oil a Damp Board
Wait until the wood has dried completely.
Do Not Leave One Side Wet
Uneven drying encourages cupping.
Do Not Use the Board as a Hot Pad
Very hot cookware can scorch the wood or stress glue joints.
Do Not Ignore Deep Cracks
Oil cannot repair structural damage or make a deep contaminated split easy to clean.
Do Not Keep Adding Mineral Oil to a Greasy Surface
Once the board stops absorbing oil, wipe the excess away.
Key Takeaway: Most wood cutting board damage comes from excess water, uneven drying, unsuitable oils, heat, or ignoring structural wear.
When to Replace a Wood Cutting Board
Good maintenance extends useful life, but wood cutting boards do not last forever.
Replace a Board With Deep Cracks
A deep split can trap:
- Food
- Moisture
- Cleaning residue
in an area that cannot be scrubbed properly.
Replace a Board With Separating Glue Joints
Visible separation between wood strips or blocks indicates structural failure.
Replace Severely Warped Boards
Minor movement may be manageable.
A board that rocks heavily on the countertop can be unstable during cutting.
Replace Boards With Deep, Hard-to-Clean Grooves
Shallow knife marks are normal.
Grooves that hold food after washing are a different problem.
Replace a Board With Persistent Internal Mold
Surface discoloration may sometimes be removed, but mold growing deeply into cracks or porous damaged wood is a reason to stop using the board for food preparation.
Key Takeaway: Replace a wooden cutting board once cracks, separated joints, severe warping, or deep grooves make normal cleaning unreliable or cutting unstable.
Conclusion
For how to maintain wood cutting board, focus on controlling moisture: wash it promptly, avoid soaking, dry both sides thoroughly, and condition the wood with food-grade mineral oil whenever it begins looking dry.
Most routine care is simple. Warm soapy water handles everyday cleaning, upright air-drying reduces trapped moisture, mineral oil conditions dry wood, and occasional light sanding can restore shallow knife marks or raised grain. End-grain boards may need more oil than edge-grain boards, but both should be treated on the top, bottom, sides, and ends.
Pay attention to the board instead of following a rigid maintenance calendar. Dry appearance, rough texture, rapid water absorption, deep grooves, cracks, and warped surfaces tell you more than the number of weeks since the last oiling.
A well-maintained board can remain useful for many years, but replacement is the correct step once structural damage creates areas that cannot be cleaned reliably or makes the board unstable during cutting.
FAQs About Wood Cutting Board Maintenance
How often should I oil a wood cutting board?
Oil it when the surface begins looking pale, dry, or rough. A heavily used board may need conditioning every few weeks, while a lightly used board may go much longer. One coat is normally enough for routine maintenance.
Should I wash a wood cutting board after every use?
Yes, especially after contact with moist foods, meat, poultry, seafood, sauces, or other residue. Wash it with warm soapy water, rinse briefly, towel-dry, and let it finish drying with airflow around the board.
Can I put a wood cutting board in the dishwasher?
It is generally better to hand-wash a wooden cutting board unless its manufacturer specifically states that dishwasher cleaning is acceptable. Prolonged water, detergent, and heat can cause warping, cracking, or glue-joint problems.
How do I know when my wood cutting board needs oil?
Look for a pale or chalky appearance, dry end grain, a rougher feel, or water soaking into the wood quickly. Those signs indicate that the wood is becoming dry.
Can I use olive oil to maintain a wood cutting board?
Standard olive oil is not a good general cutting-board conditioner because it can oxidize and develop unpleasant odors. Food-grade mineral oil or a product specifically made for cutting boards is a better choice.
Should I oil both sides of a wood cutting board?
Yes. Apply oil to the cutting face, bottom, sides, and exposed end grain. Treating the whole board reduces large differences in moisture absorption between surfaces.
Can I sand my wood cutting board?
Yes, light sanding can remove raised grain, shallow knife marks, and some surface staining. Clean away all sanding dust afterward and apply food-grade mineral oil to the newly exposed wood.
When should I throw away a wood cutting board?
Replace it if deep cracks, separated glue joints, severe warping, persistent internal mold, or hard-to-clean grooves make the surface difficult to clean or unstable for safe cutting.